Creating a professional looking website seems cost a lot of money but that isn’t true. Create 2021 Professional Website is free or at an affordable cost. To Sam’s experience, having a few websites just cost him less than USD 200 per year including 200 GB of Webspace, 5 Domains and 500 email accounts. What you need is having a little basic knowledge of how to build a website. What is even better for this 2021, most of every website template is Drag and Drop, if you know how to use Word Document, you are good to go. It is true that there are tons of sites offering frees solution to build a website. However, to Sam’s recommendation, you better to invest a bit into a professional world.
With One.Com, Sam’s favorite domain and hosting company, the investment is as little as 4$ per month for Hosting / webspace cost and 15$ to 20$ dollar per year for domain fees. You get the beginner plan including 100 GB SSD storage, 200 mail accounts, Daily backup, https// SSL certificate What is good about One.Com is it has One-Click WordPress Install Feature, which is very convenience for website building beginners.
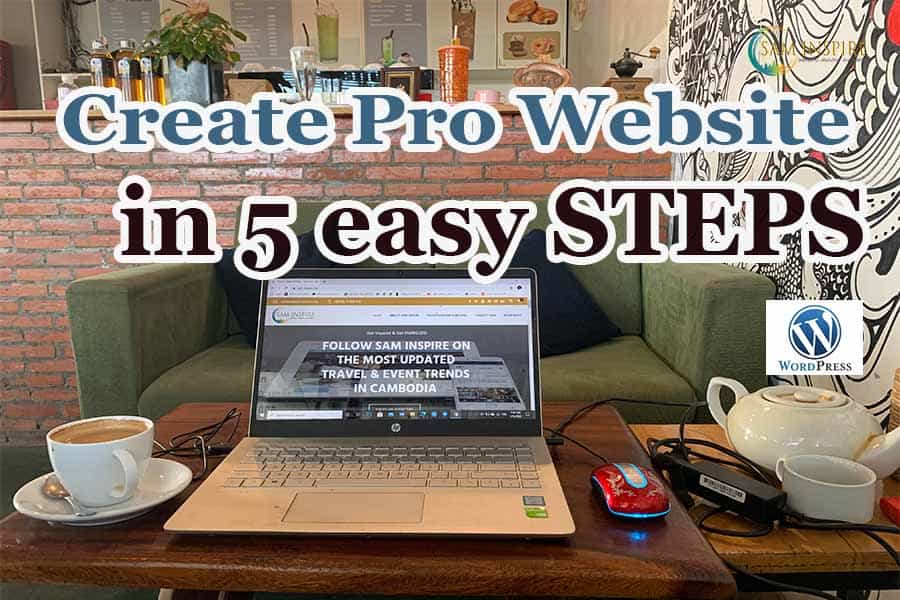
In the following section Sam, the author of Sam Inspire will guide you Step by Step on How to Build a Professional Website in 5 Steps from A-Z:
- Buy Hosting plan and Domain name
- Install WordPress with 1-click installer
- Install Ready built Theme / Platform
- Theme Setting and Content Creation
- Upload Plugins, Create pages and posts
There are many CMS site like Wix.com, Webs.com, WordPress.com, Google Blogspot.com, Google My Business, Sites.Google etc. If you go with a free domain plan, your site will have to end in that company extension, like www.sam-inspire.wordpress.com. To have your own professional like www.sam-inspire.com. you need to purchase your own domain either from that site or from other site at cost around 15$ per year. To make thing easier, Sam Inspire recommends to buy your own domain from the any hosting service that you are using. Like this, all will be in one stop. You don’t have to go here and there and getting the mess with all those technical setup.
Anyway, since we are talking about using WordPress.ORG Content Management System CMS, let’s just focus on this. WordPress.ORG the most used CMS in the world such as BBC America, Microsoft News, Tech Crunch, Facebook Newsroom and more… WordPress (WP) works best with blogging, a large community, well maintained and developed with tons of free Themes and Plugins. It is also super great to play around with Search Engine Optimization (SEO).
In this how to build a professional website for beginners article, we are using One.Com WordPress hosting as the practical example. We believe you will get an idea how things work on other sites of your preference as well. What is good about One.com, you can build your WordPress website within a day with extensive and responsive help section and live chat are always there to help you, no matter where you are located. Let’s jump to the steps.
i- Choose a Hosting Plan and Domain Name
To get started with creating a WordPress website, you need hosting (web space) and a domain name (web address). You just go to your Web Browser and type www.one.com where it leads you to the following screen or just simply hit the provided hyper link.

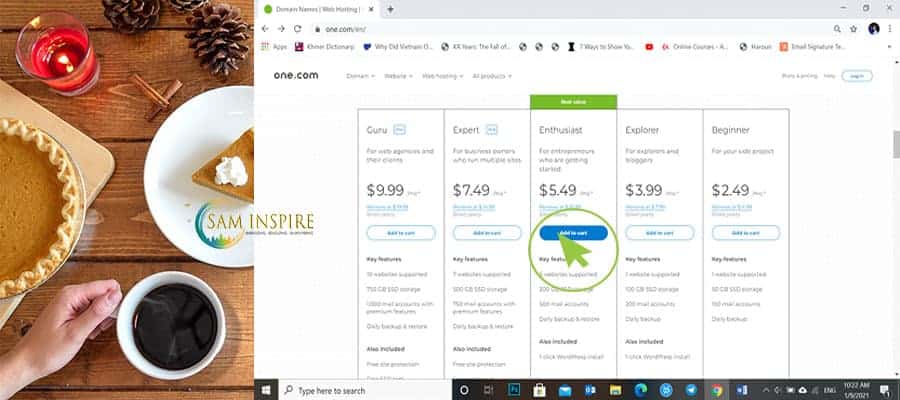
In this screen, you will find right away the hosting plan with what included. For non-experienced website builder, please go with Explorer Option, don’t take the Beginner option because with Beginner, it doesn’t include 1-Click WordPress Install feature, that means no use. After you have decided, Click on Add to Cart, from here it will lead you to this page.
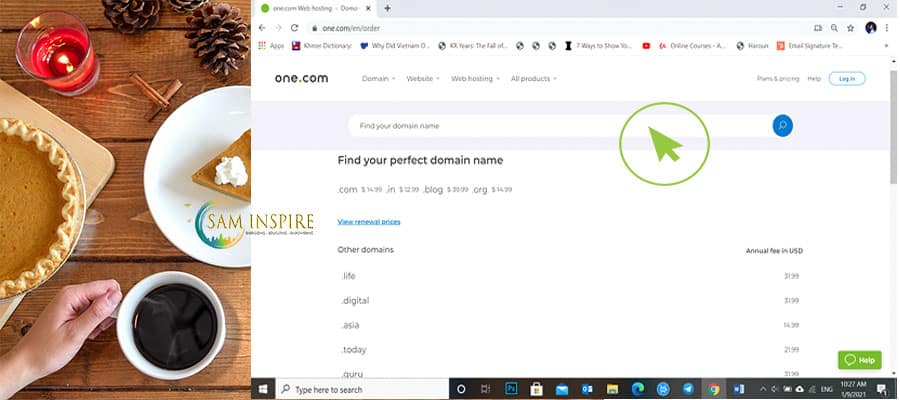
In the Find your domain name Search Box, type the name that you want your website address to be, like for mine “sam-inspire”. From here you can see the available extension like .com, .org, .asia, .info at the end of your name like sam-inspire.org, (my sam-inspire.com is not here anymore as I already purchased it). Feel free to play around here until you are good to go. Once you are fixed with your decision, you can hit Enter after typing your website name. Then you will be lead to this screen.

One the Left, there are more choices and suggestion of domain extension with prices. On the Right is the total pricing for your Hosting and Domain fees per year or 12 months. Then, just simply hit the blue highlighted Continue Button to move on. You will see another similar screen, make sure your total price is the same as previous, because here, One.com try to sell more of their products. Hit Continue again, and it will lead you to Open an account with them.

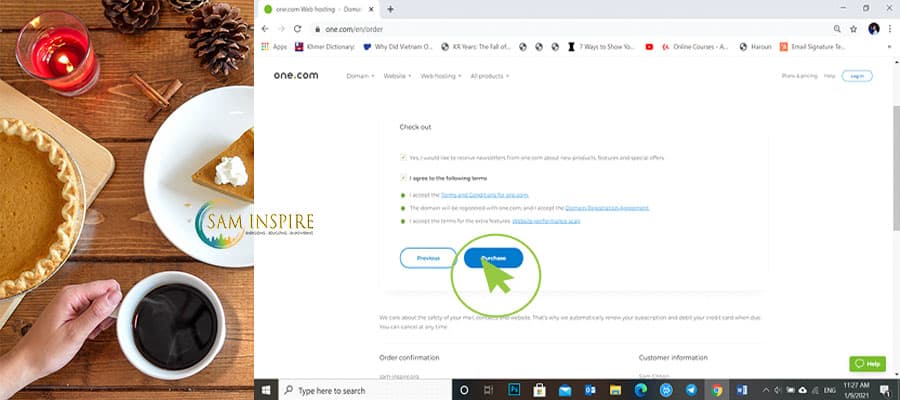
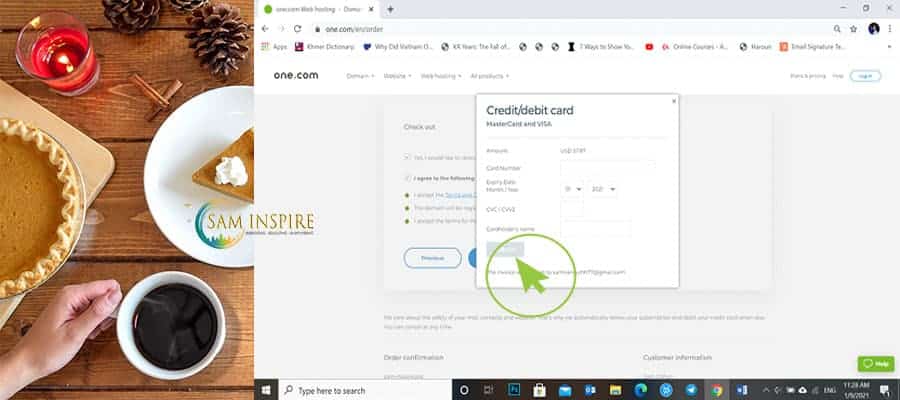
Just easily fill all the gaps required. For the last Yes and No question, that one is for those who buy the domain for others not for yourself, then you can select No. Once all done, hit Continue. Now it leads you to Purchase and Check Out page. You put Check Tick to agree with all their terms and conditions:
Now, fill up the payment form and you are done.
Once completed your payment. Please go to your email inbox. You will get two emails. One is about your invoice and another one from robot@one.com is the one that will lead you to Hosting Control Panel. This is very important, therefore please keep it secured to yourself. Hit on the blue Go to Control Panel button.

ii- Install WordPress with 1-click Installer
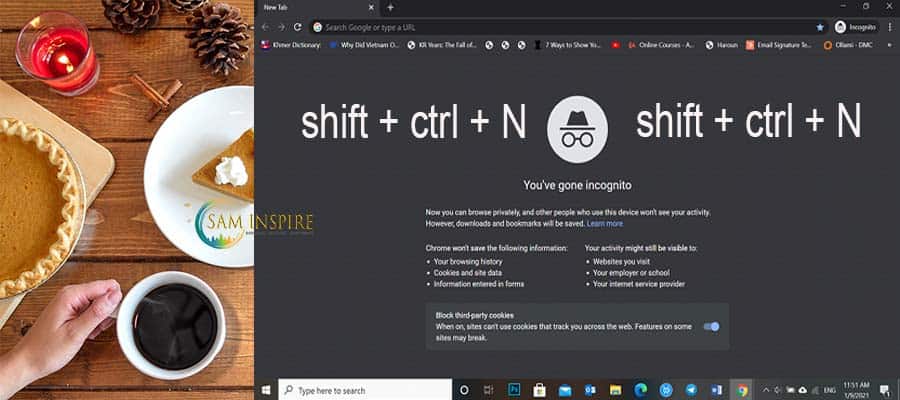
This will lead you to Control Panel Login screen, just fill your email and password. Another alternative and Sam’s most recommendation is to safely login and Install your WordPress CMS, is using the Private Web Brower. If you are new to it, this is how to open Incognito Chrome Browser. 1)- Open your web browser, my best one is Google Chrome but you can use your own. 2)- Hold Shift + Ctrl + N you will be lead to this Incognito Screen or Private Screen.
Type www.one.com in the browser or just click this hyperlink. Hit on the Login Button on your Top Right of your screen. You will see a list of Dropdown Menus, and Hit on Control Panel (sometimes location changed, so just check around there).

When it brings you the Control Panel login page, just fill in your admin email and password. Here, you are in your Hosting panel. Everything is your authority over your domain and hosting services and activities are here.

On the Left, you can see your domain (sam-inspire.com). If you have more than one, the up and down arrows will show them all. Then you can see a lot of function around the screen. You can tour around later. What you are looking into now is How to Install WordPress website in one Click. Therefore, on your left, you can see WordPress section. Just Click on See more, and you will go to this Screen.

The upper section on the Left, you can see New Installation, for any new website and on the Right, Migrate website, if you already have your website from other Hosting and wish to change to One.com.
For you, it is new right, so click on New Installation, Sam has already installed his main home page but so he only creates a sub domain in this in guide. After clicking on Installation, you will be on this screen, Welcome to WordPress.

Then click on Continue. Now, you are here on Contact page and the information filling. This will be your WordPress login details, so remember it well and make it the safest one, because their are millions Hackers next door want this information.

Enter contact details
- Enter a username, you will use this to log on to your WordPress administration.
- Choose a password for your WordPress username.
- Enter an email address, this will be your primary contact for WordPress, for example if you forgot your password.
- Click Continue.

Enter Settings
You need to choose a title and tagline for your WordPress site. You can always change it later.
- Choose a title for your website; it will be visible in your browser tab.
- Enter a tagline for your website; it should be a short catchy quote / motto that supports your title or your business
- If you don’t want your site to show up in search engines, check the box.
- Check the box to agree to the terms of business.
- Click Continue.
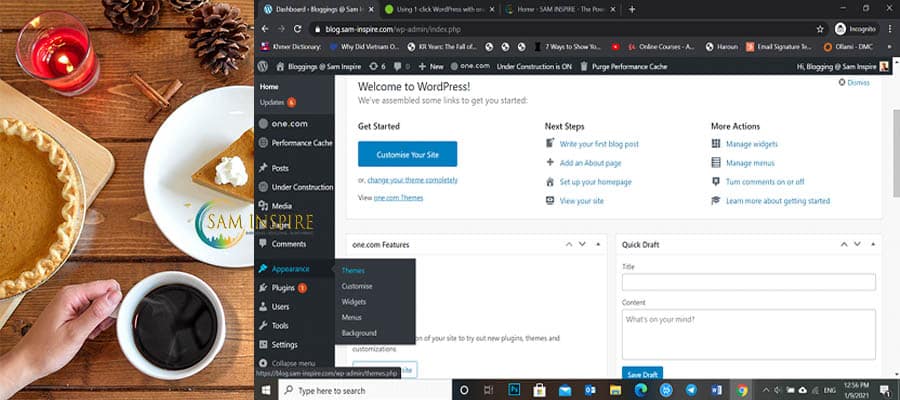
You are done and your WordPress is now ready. One.com will give you a number of Themes which are the Designs or Templates of how your website will look like from the Home Page frontend.
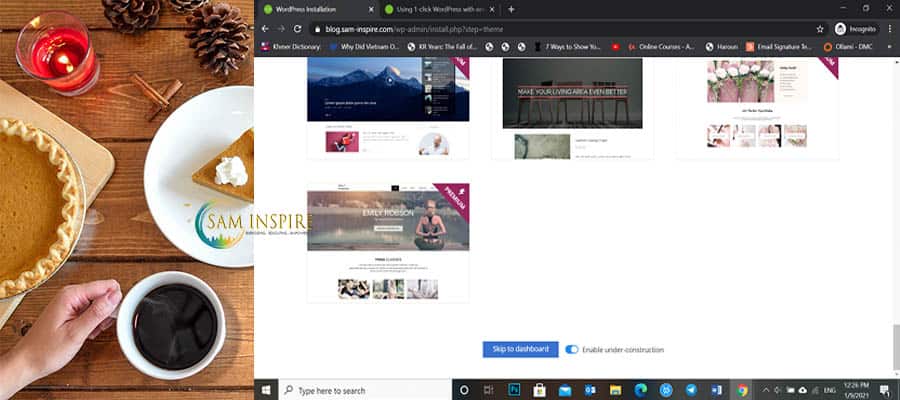
You can pick one from here, if you don’t want, Just Scroll Down to the Bottom of the Page to look for Skip to Dashboard, and Click on that Bottom.
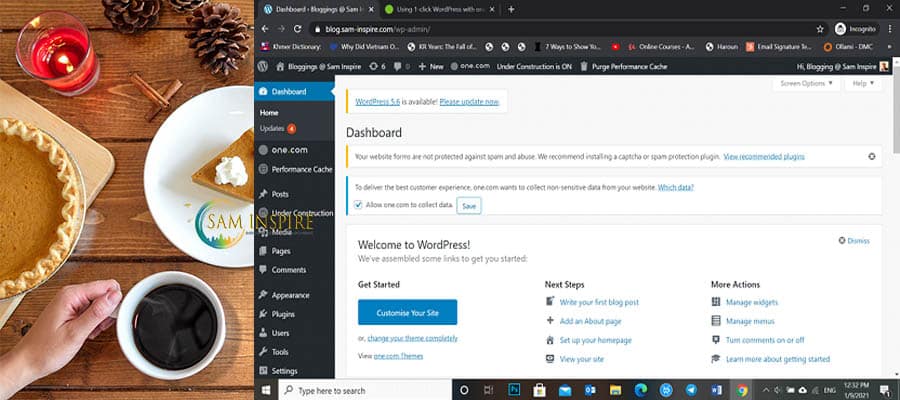
You are here, some set up has been already done by one.com but you can always remove anything you don’t need. WordPress is not ABC easy but it is not ZYX difficult. It is somewhere in between. Be passionate about it and get yourself handy with it.
iii- Install Ready built Theme / Platform
From this Dashboard screen, you can look on the Left sidebar. Here are all the access to all the functions that you will need.
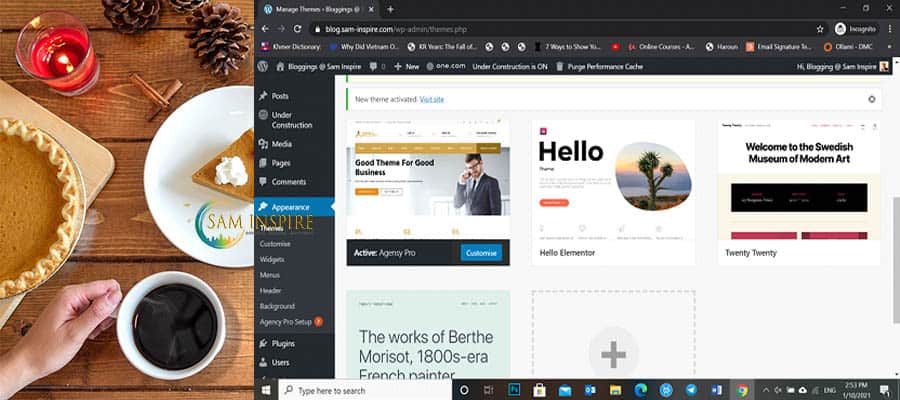
You can start with whatever you want, but for this WordPress Tutorial, let’s start with what design that Sam Inspire Website and AFK NGO website have. First, let’s go to Appearance and click on Theme, as shown on this screen.
Then it will lead you to this screen of the Theme options. You will see some themes have been automatically installed by WordPress. We will delete them later, after we have own theme like one.
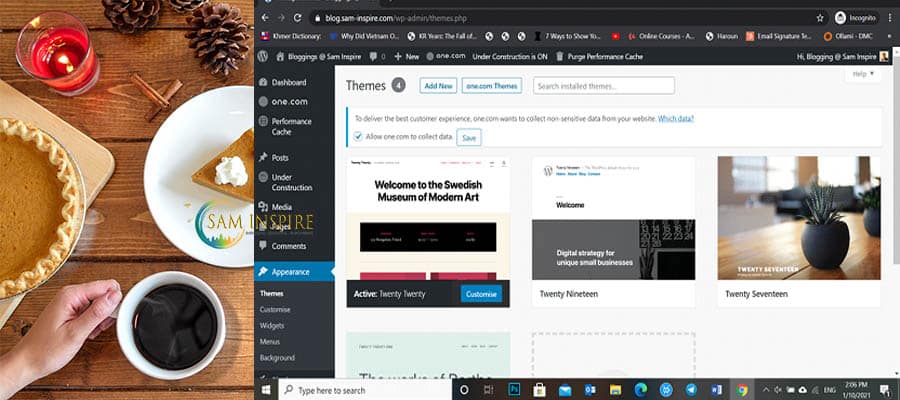
From this interface, you can delete, change, and upload your own theme. There are two ways that you can Add your own theme. 1)-Selecting from the Search Theme Box, 2)- Upload Theme of your Downloaded Zip File. After clicking on the Add New button, it will lead to you the following screen:

How to Add Theme to Your WordPress in Two Ways:
1- Install from the Search Themes Box
On your right top right tab, you can see Search theme Box. Here you can search for any free Themes on WordPress.org database. Example: if I want to have the Theme on Trend for 2021 of Elementor, I just type Elementor word in the box, then it will automatically give you a broad number of similar themes. You just look for your own which is Elementor theme and Click on Install Button on the Bottom of the featured image.


If you are new to Elementor, it is beyond a Theme, it has a wonderful page builder Plugin for free with an option of Premium Upgrade to use all their available page templates and other function. For beginner, their free version is working best.

After clicking, it will take a while to complete the process. Then it will show Activate and Live Preview Button. Click on Activate Button to use the theme on your website.

After that, it will bring you back to the Theme interface, where you can customize your website Homepage. If you are good to go with Elementor, this Theme will show a recommendation to Install also Elementor Page Builder Plugin, so please follow the suggestion. By the way, Sam Inspire will explain about the Plugins in the next section of the Tutorial.
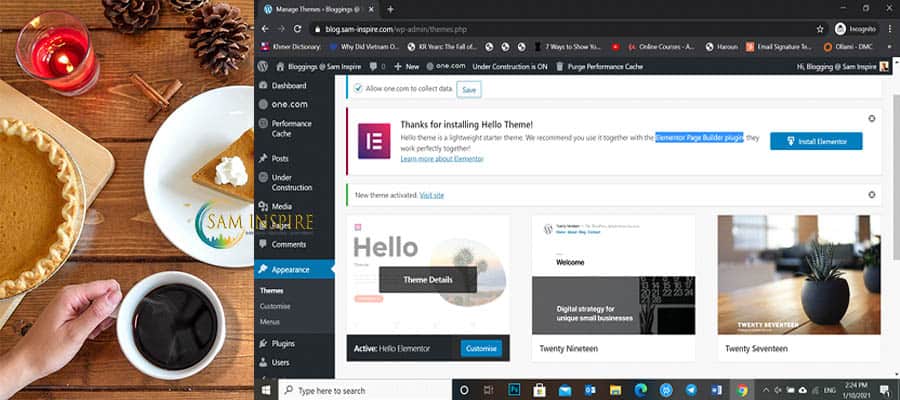
From this section, you can see there are many themes here installed to your store. It is recommended that only keep anything you are using, if not using, just delete it.
In order to delete any unwanted themes on WordPress. You just click on that theme that you want to delete, it should appear “Theme Details”, click on it. In the next screen, scroll down to bottom of the screen, you will see the Delete Button, on the Bottom Right. Click on it, and a Pop Up verification will appear like “are you sure you want to delete this theme?” Just click on OK. Then you are done of deleting a Theme from Your WordPress website.

Once your Theme Installing is done, you can start Setting Up your Theme. You can jump to the section of “iv- Theme Settings and Content Creation” below.
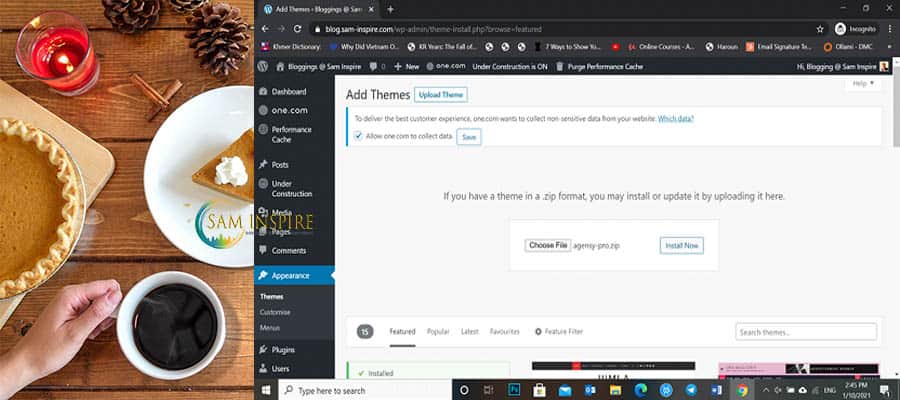
2- Upload a Theme of your Downloading File
Again, click on Add New Button. Then, it will lead you to the next screen. On the top Left next to the Left sidebar, you can see Upload Theme Button. Just click on that Button, it will lead you to find the location of your saved Theme File. Therefore, make sure you have downloaded and know where it is located.

After hitting the Upload Theme Button, it will show you this Text in the next screen “If you have a theme in a .zip format, you may install or update it by uploading it here.” Therefore make sure your file are in .zip folder format, otherwise it won’t succeed your uploading. After selected you .zip folder, you can just click on the Install Now Button as following screen.
You are almost there. After waiting a bit, depending on how big and how good your internet speed is. You will be lead to the next screen that you will need to Activate the theme to use it on your site. You just click on the Activate on the Bottom center located.

Now you are back to the Theme section of your website backend interface where you can start Customizing your website homepage.
Once your Theme Installing is done, you can start Setting Up your Theme. You can jump to the section of “iv- Theme Settings and Content Creation” below.
Theme Used on Sam Inspire Website
With the Agency Pro-theme that Sam is using for most of his websites he built. This theme is the property of a well-designed themes and plugins for WordPress in 2021 AccessPress Theme that Sam got recommended by my friends in Germany. There are varied choices of free themes and pro-themes as well as Plugins. For Sam, he just bought only one time and can use for a life time with unlimited website. Sam recommends that you better to invest on this, the cost only around $50 lifetime.


Nevertheless, since this WordPress website builder is based on how to get a website that look the same as Sam Inspire and All FOR KIDS NGO website. Let’s Sam guide you on how to get his websites done with Access Press Premium WP Theme, Agency Pro.
First go to the Access Press Themes website. Move your mouse cursor to the menu bar called “WordPress Themes” next to Home. Then, you will see a list of Dropdown menus, with “Premium WordPress Themes”.
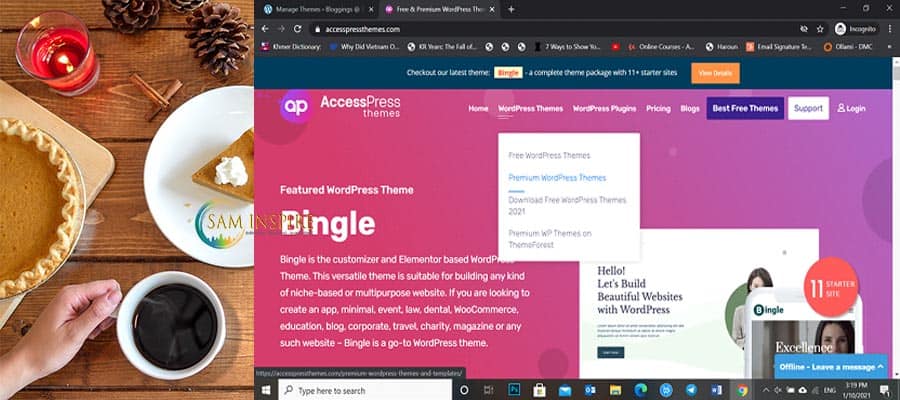
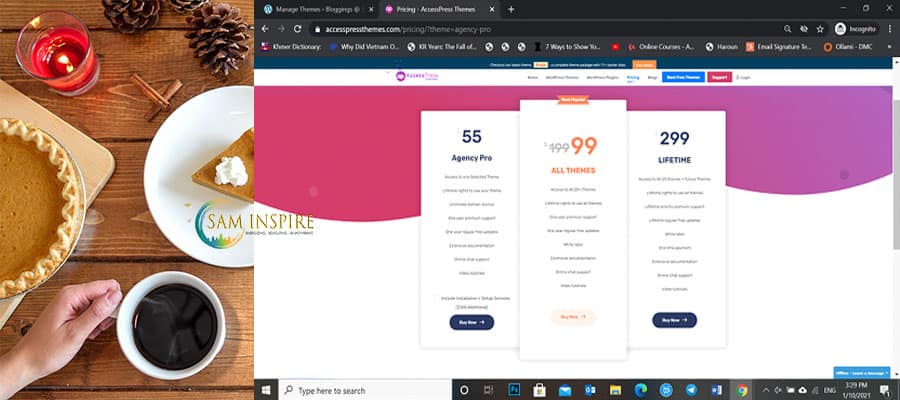
Click on this menu, and you will be lead to a number of Pro Themes where Agency Pro, that is tutorial is talking about normally located on the 3rd right on the top of the list. Just move your mouse to that product features, you will see the View Details, Buy, Domo bottom. Yes, it is 55$, it is worth investing as you can use it for many websites.

You can just hit on buy and it will lead you to the next screen which is more details of the plan. Here Access Press also try to upsell of their product. No, worry just buy this basic package is good enough to go.
Just click on Buy Now and proceed to Check Out. If you have any discount coupon, you can apply, unfortunately Sam doesn’t have any neither.
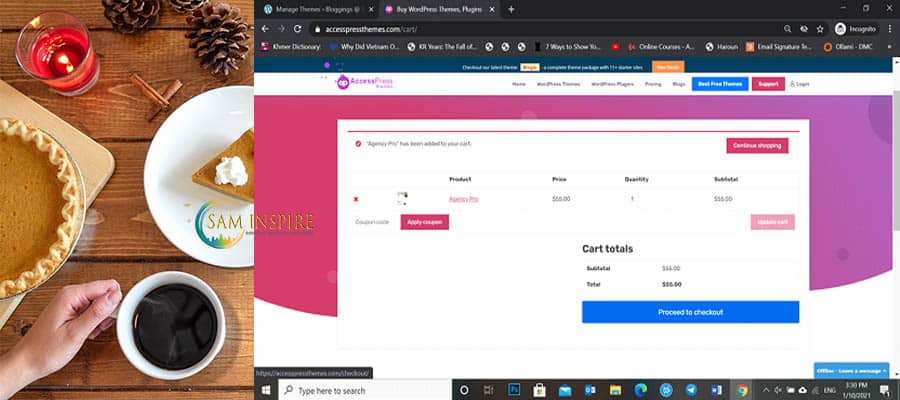
After clicking on the Proceed to Checkout button. You will need to fill some information to Create an account with Access Press website. This portal is your database where you can come back to download your Purchased Themes any time.

Since Sam has already done his purchasing, he believes you won’t find any difficulties in paying them. If you do, please contact the Access Theme support team. They are very helpful. Then assume that you have done your purchasing and have the User Name and Password to login to Access Press website where you can download your Agency Pro theme.
To start with, just go to Access Press website Home Page. On the Top Right, you will see the Login menu. Click on that menu and fill in your user name or email address and Password in the Left boxes to login to your account.

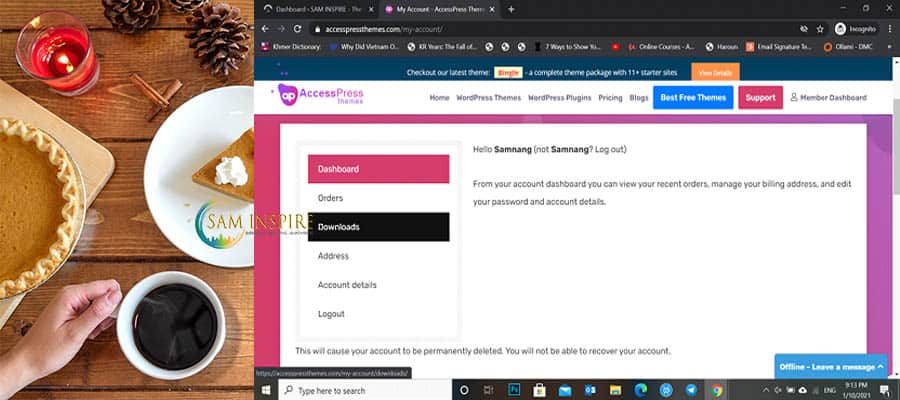
Once you are Login, you will the Member Dashboard on the Top Right. Click on the menu, where you will be guided to your File Download Area. Then just simply click Download and when you see your Theme name Click on the V 1.0.3 (could be already updated to the later version in your time) under the Download column.
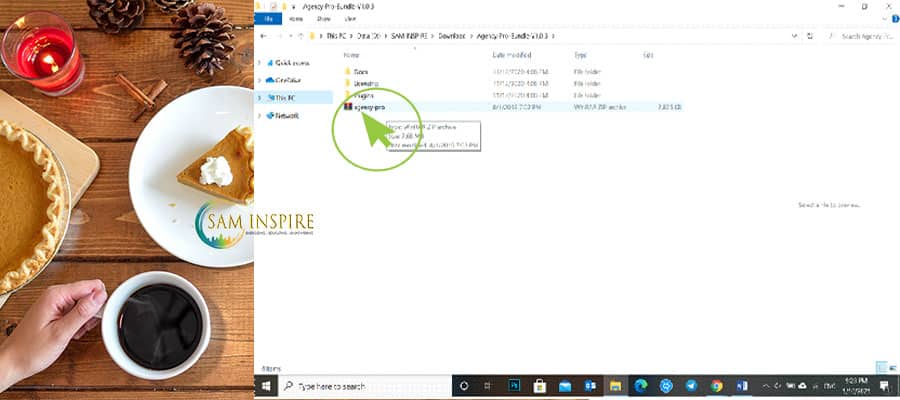
Once your file or folder has been downloaded. Go to your file, you will find the Folder named Agency-Pro-Bundle-V1.0.3.zip. Please be careful here, this file is not ready to upload to your website yet. You will need to unzip this folder first because this folder include some folders in it that WordPress doesn’t want. To unzip, you just Right Click on the Folder and Extract the file

After extracted the file out, you will see a simple folder names Agency-Pro-Bundle-V1.0.3 Just open this Folder, and here you will see the Agency Pro Zip folder which is the one that you are going to upload it to website theme section.
Now, the Premium Theme purchasing and Downloading are done. You can go back to 2- Upload a Theme of your Downloading File section above and follow all those steps over.
iv- Theme Settings and Content Creation
For Agency Pro theme, what is even easier for non-expertised website builder, it has the Demo setup already created for you. What you need to do is Clicking on the Agency Pro setup at the Bottom of the theme screen.

After hitting, you will be brought to the Agency Pro welcome page Welcome to Agensy Pro – Version 1.0.3. On this screen, you will see a few important menus that you will need them some time. To begin installing your Demo site, just clicking on the Import Demo tap, where you will see the Install and Activate Button underneath. Click on that and wait a bit.

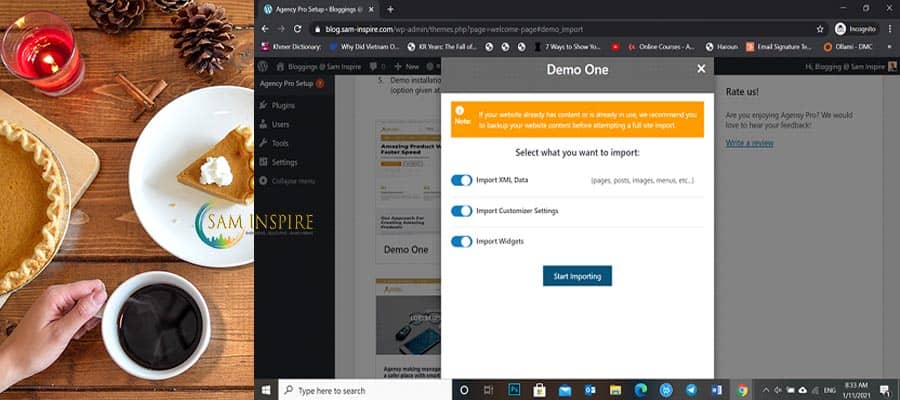
Hurray, you are almost there. Three demos are ready made for you. Preview of all of them to tour around which design of the front-end home page fit yours the most. Once you made the decision, just click on Import. For this tutorial, let’s start with Demo or template number one.

After clicking, it will ask you to install some Plugins, please just follow the recommendation. If you don’t need later, you can still delete them. Then click on next Step and next Step.

Then, it will ask you to select what to import, just take all as what it has already done for you, so leave as it is. And hit on Start Importing. This will take a while unit it said Demo Imported – View Site.
You can click on View Site to see how your website front-end look like.

Wow, beautiful! Just like a website that you expected to spend a few thousand dollars on it but yes, no, it is as a little as a hundred dollar so far right.
What’s next, if you need to replace the Content of the website with your own. Ok, let’s head over to our backend or the admin screen. If you already lost your Login screen just add “/wp-admin/” after your web url like this https://blog.sam-inspire.com/wp-admin/ and hit Enter key.
Normally, your computer should still remember the login details so it will bring you to the backend screen right away. If not just fill in your login details again with user name or email and password. We are now back to the main Dashboard of our website.

To update the contents on the homepage, just move your mouse cursor to Appearance on the left bar. You will see some functioning menus appear on the Right. Under the Theme, you can see Customize, Click on Customize menu.

Then it will bring you with the Theme customized menu bar and the Left end and Edit Preview result on the Right.

To edit or replace with your content, you can hit on the pencil mark to bring you the edit area on the Left. Just find the what you need on the left menu to see where you want to it your home page. The best is trying around for everything to get yourself familiar with it. When you are good to go, you can start put your final content.
Among these 13 menus, Home Page Section is the most important to get your hands good with. It is the setup of all the sections on your homepage. Then, Site Identity to replace your Logo and Contact information. Then the Footer Setting to update the Copyright Text.
To find more guide, you can visit the full tutorial on https://doc.accesspressthemes.com/agency-pro/ and feel free to post your questions on the support community under the Pro Theme and Agency Pro category.
v- Upload Plugins, Create Pages and Posts
Once your Home Page setting is now done. Explore the WordPress Dashboard to get familiar with the Features and Settings. After that, it’s time to create some pages and posts. You can just edit from the sample pages and posts or just create your fresh ones.
Just to remind you that if you are looking for a modern Page Builder tools to make your landing pages and posts looking cool. Elementor is the top page builder plugin in this 2021. There are many ready-built-page templates that you just need to edit text and replace pictures.
With any of Elementor’s themes has already created some sample pages to help you get started. Edit existing pages by adding your own content and create new pages. You can always preview your changes before you save them.
You can also publish blog posts on your website. Check out the sample posts to figure out how to create a new blog post. Posts in your blog can be categorized, and you can allow or disallow visitors to add comments. This is a good way to drive traffic to your website. If you are creating website as a blogger, better to write at least 10 good posts to apply for Google AdSense.
Install Plugins
One of the best things about WordPress is the use of plugins to enhance your website. A plugin is an extra feature you can add to your website to function or look better. For example; a contact form, speed and security optimizers and plugins that assist you with online marketing. Some Plugins were already installed along with the theme.
There are thousands of free plugins available that can help you to Create 2021 Professional Website to the next level. Check the reviews of a plugin and the last time it was updated before you install it, so you don’t install plugins that might harm your site.
Follow Up and Update WordPress Website
Getting used to WordPress takes some time, but once you get the hang of it, it’s a fantastic platform to create and manage your website on. Here are some tips on things you should do after creating your WordPress website from one.com.
- Discover your WordPress dashboard. Discovering the features and options in your WordPress dashboard is the best way to get familiar with WordPress. Try to find some useful plugins, create some posts and pages and play around with the design of your site!
- Create a professional email address. Having email on your own domain gives you a professional look and builds trust between you and the receiver. You can update your new email address in the WordPress dashboard and use it for admin purposes.
- Keep your WordPress website updated. WordPress regularly releases new versions and it’s important to keep your website updated with the latest version. This makes sure your website is updated with the latest security features and is less vulnerable to digital threats. Besides the CMS itself, it’s also important to keep your enabled plugins and theme up-to-date.
- I believe you find this tutorial brings you will the practical knowledge to build your own website. As said you save some money from this and everything is under your hand. You don’t have to rely on the website company to edit any contents that you want to get updated.
SAM INSPIRE family hopes you find this information useful to your research. This article is the reflection of Mr. Sam’s knowledge and experiences. If you need further support, please feel free to contact Sam, he will be so happy to do more steps to help you out.
If you find value in this article and wish to support Sam to do more, please feel free to pay him a coffee to his bank below. Thanks for being part of Sam’s journey, Sam Inspire – the Power of 3 E’s, Energize, Educate, Empower.